The Facebook Pixel Helper Guide for 2022
Veteran marketers in the digital media marketing industry know about Facebook Pixel Helper and its various uses! If you possess the skill and the knowledge of its functionality, you know how useful it is. In this article, we will learn about the Facebook Pixel Helper and how to set it up! Read ahead to learn more!
New apps and tools are available to aid in the marketing process as more individuals become marketers and learn about marketing. Facebook has also played a role in assisting companies by introducing various tools. Previously, Facebook launched Facebook Pixel to determine conversion rates today. There were several issues with utilizing it, so Facebook released a new tool called Facebook pixel assist. The number of people using these technologies appears to be increasing the numerous advantages they provide.
To understand Facebook Pixel Helper, we need to understand what Facebook Pixel is. Let’s dive straight into it!
What is Facebook Pixel?
The Facebook Pixel is a snippet of code that you may add to your site. It aids in determining the efficacy of your Facebook ad campaigns by tracking the actions users do on both your site and on Facebook.
The Facebook Pixel tracks multiple events efficiently. It can track the view count of your page, the scrolling length of a user on your website, cart abandonment, and introduces or retargets your ads to custom audiences.
The Facebook pixel is a piece of code that you can find in ad management. It incorporates itself into the header of your website to track events like conversions and visitors. After you’ve gathered this data, you can quickly send Facebook advertising to potential consumers interested in your products and services. It is an essential feature that may considerably assist you if applied correctly and promptly.
The Facebook Pixel is a little piece of code that you may place on your website. It helps you figure out the effectiveness of your Facebook ad campaigns by watching what people do on your site and Facebook.
The pixel links a website user’s data and behaviors to their Facebook profile. You may utilize the information to optimize ad results, retargeting advertising, and even conversion optimization on your website.
As a vital aspect of social media marketing analytics, using data to understand your target consumers is critical for expanding your online business.
After you’ve put it up, it’ll operate in the background of your website and track user behaviors without requiring any more action from you unless you wish to customize the data it collects.
How does the Facebook Pixel help?
The Facebook Pixel assists you in tracking events from custom audiences suitable for your website and helps you get better conversions online. For instance, I went on Amazon to look for a toy for my cat. I look it up on Amazon. I find the toy perfect for my pet, and I add it to my cart. I got distracted soon after that and forgot about my cart addition.
Later, when I open Instagram, I see the ad for the cat toy that I forgot about after adding it to my cart. It is called retargeting.
The Facebook Pixel assists in attracting custom audiences to your product and reminds them to complete their purchase, thus boosting ROI. It is also one of the smarter ways to gain followers! Check this article for more!
To sum it all up, the Facebook pixel is code that resides in your website’s header. It gathers insights from visitors like their location, the device they might be using, and their preferences, among other things. It learns about the interactions on your website and tracks their behavior. A majority of this data facilitates the creation of custom and lookalike audiences for the better reach and traction of the product.
Now that we know about the Facebook pixel. Let’s take a look at how to set it up to benefit and boost our sales!
How To Set Up Facebook Pixel
The process of setting up a new Facebook pixel is easy! Follow the following steps and get set your pixel within a matter of minutes!
Creating a Pixel
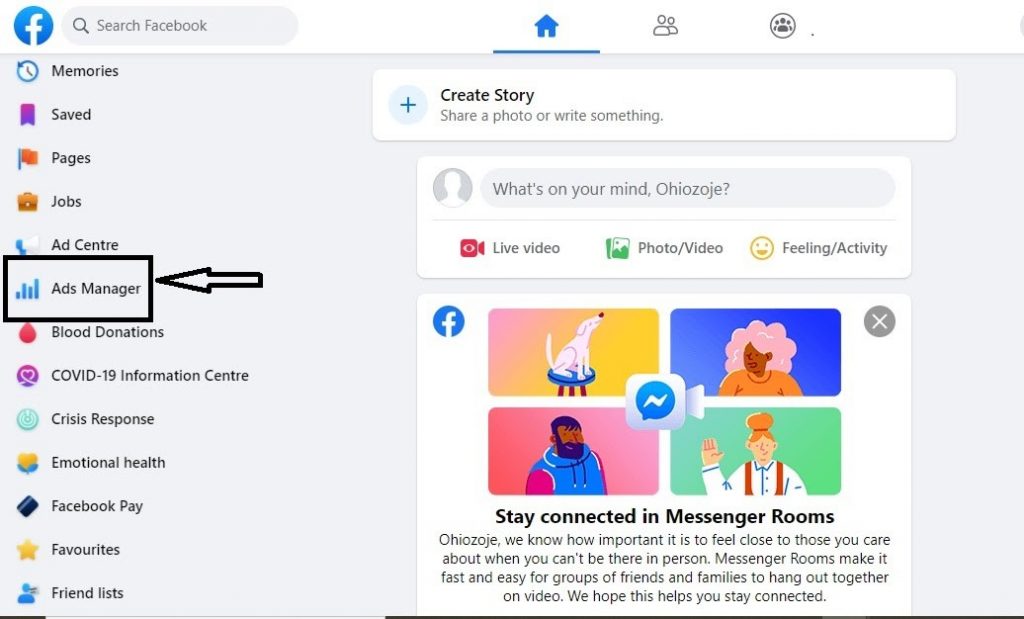
For that, navigate to Ads Manager on Facebook. You will find it as specified in the screenshot below:
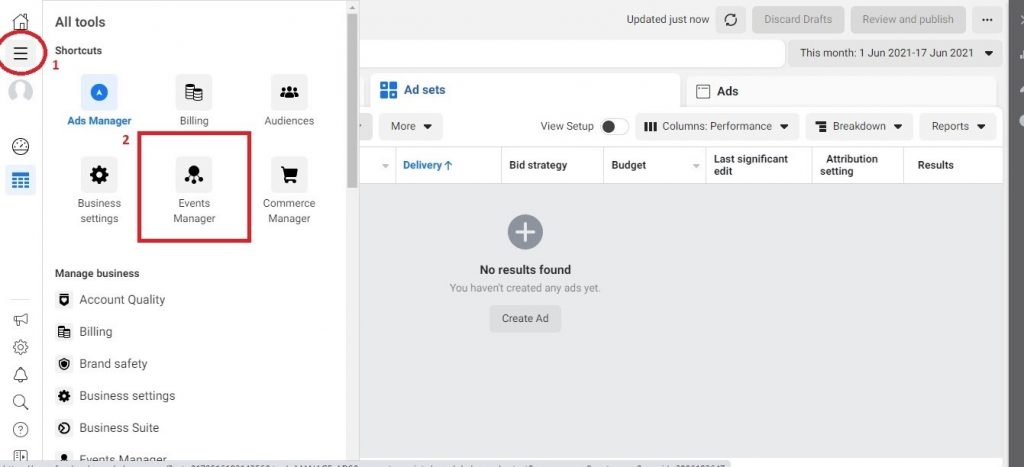
Next, look for the icon with three lines. Clicking on it will provide you with different managers. From those, click on Events Manager.
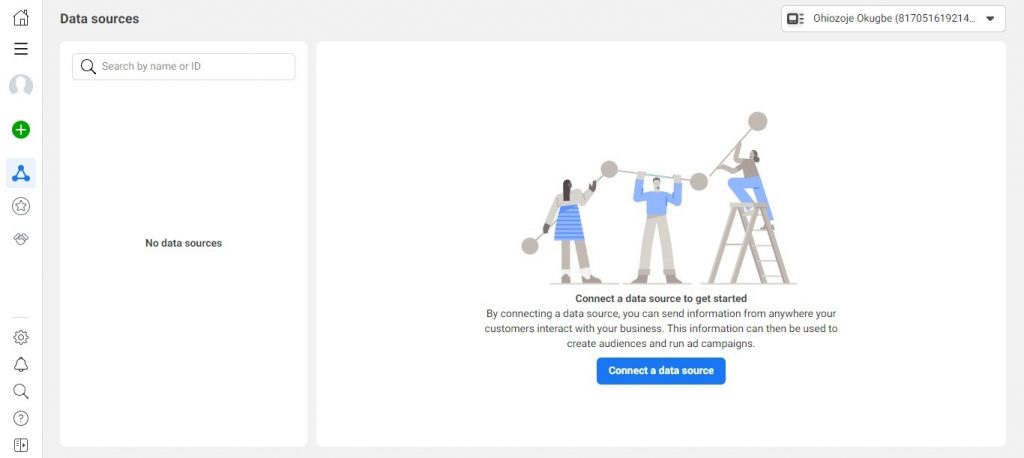
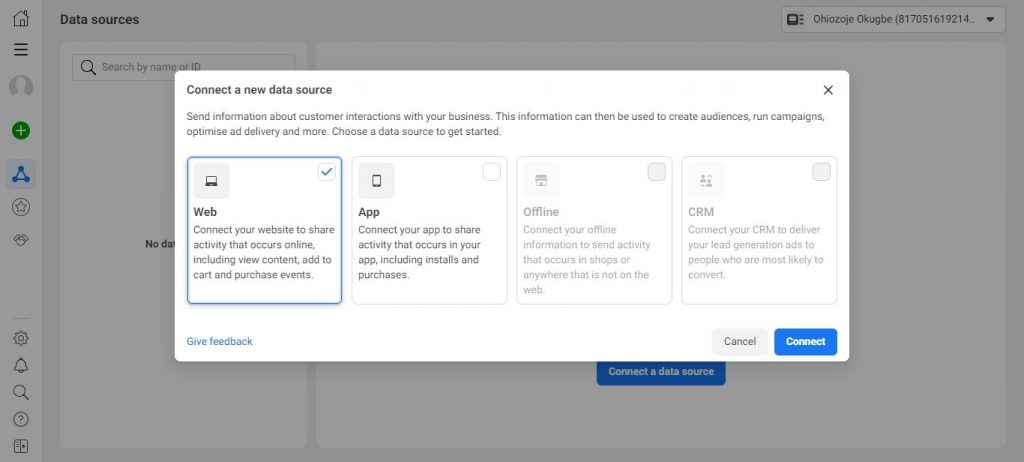
After opening Events Manager, click on the blue button that says “Connect a Data Source.” In the popup that appears, click on “Web.”
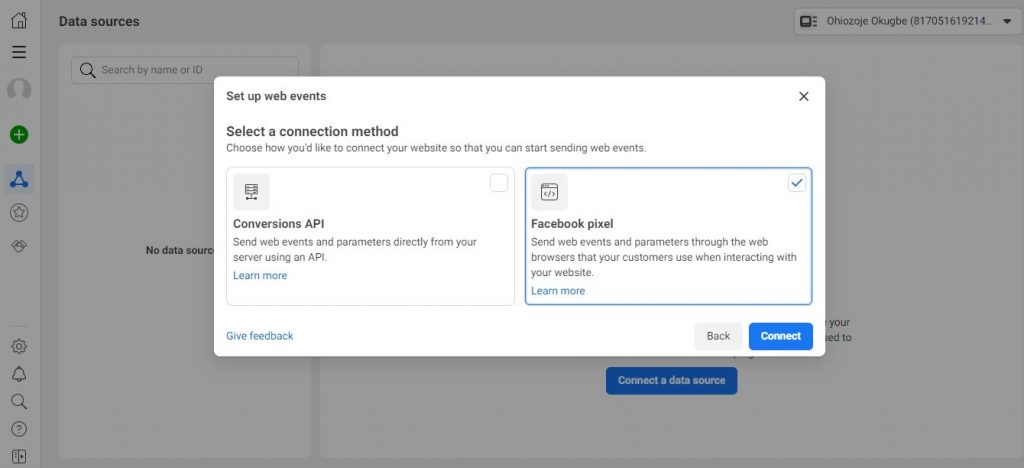
Click on “Facebook Pixel” on the window that pops up next and then click “Connect.”
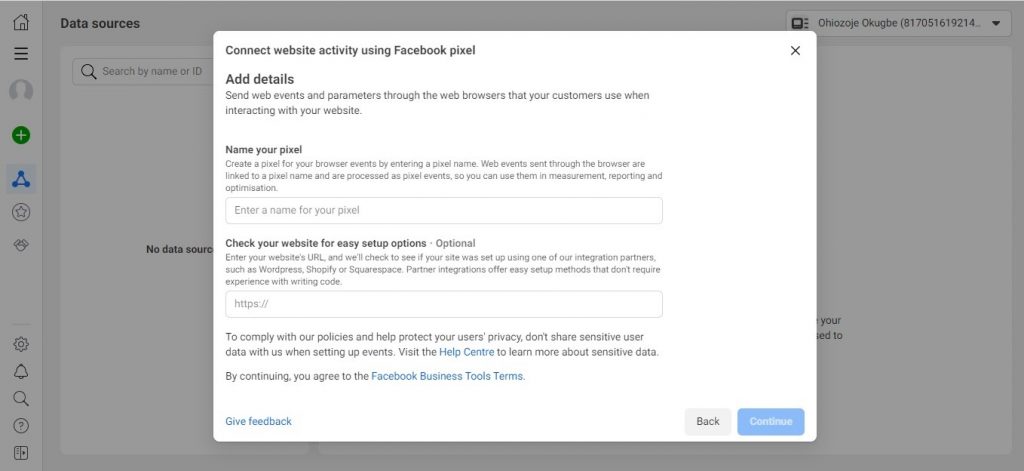
Facebook will introduce you to your new pixel and debrief you with some general information. Next, it will ask you to name your pixel and fill in the URL for your website.
Once all these details are complete, your pixel is ready to slide into the cookies of any user navigating to your website and making sure they remember you! Let’s put it to use!
Installation of the Pixel
There are three ways Facebook has provided you for installing your pixel: You may do it manually, have a partner integrated with your website (like Shopify, WordPress, etc.), or simply mailing your instructions to a developer who will do it for you.
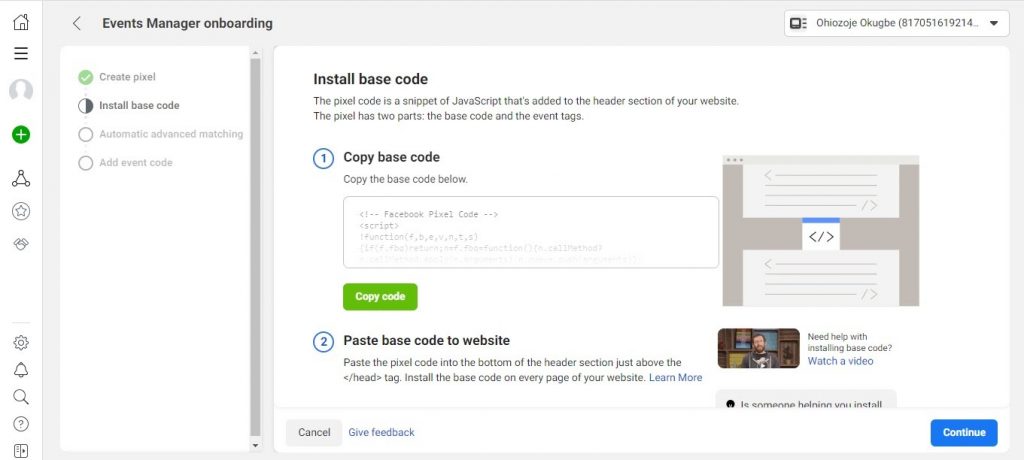
For this guide, we will be installing our pixel manually. After clicking on “Install Code Manually,” click on “copy code” to copy the code to your clipboard.
On your website, edit your header template and paste the code on it. Sites like WordPress offer plug-ins for easier insertion of your pixels.
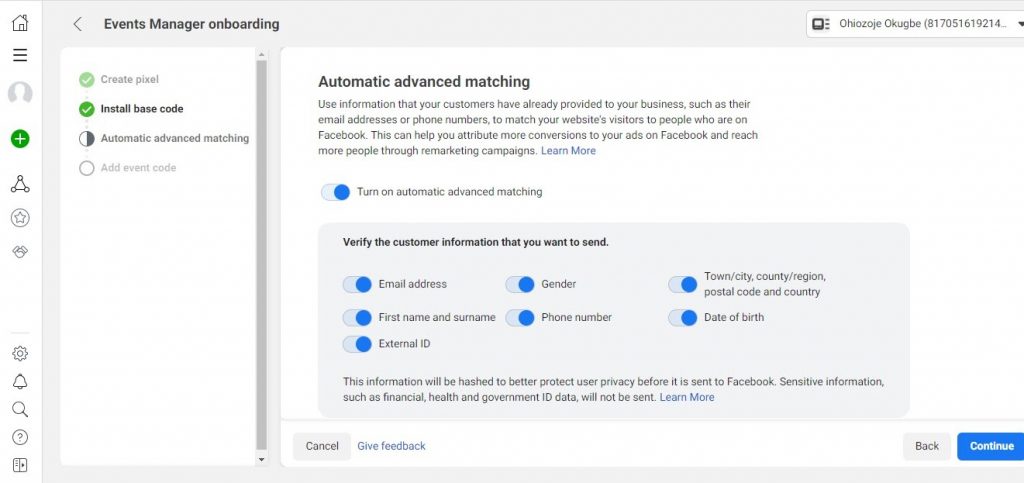
After inserting your pixel into your webpage’s header template, head back to Facebook and click “Continue.” It will open up a new window called “Automatic Advanced Matching” with a switch. Turn it on to select what information of your customers you’d like to send to Facebook.
Install codes for the events you’d like to track next. For example, you could want to keep track of how many times someone adds anything to their cart or how many times they leave your website after doing so. You could hire a developer to assist you with this phase.
Note: When installing the pixel with partner integration, please check the instructions for the platform of your choice. Instructions are specific and differ for each partner platform.
Facebook will redirect you to this popup after you finish your integration process. Fill in the check box for successful completion of your integration and press “Next.”
It is vital to check if the pixel that you set up is fully functional or not. To do this, fill the specified field with the URL of your webpage and press “Send Test Traffic.” Facebook tests and verifies the functionality of your pixel. Upon completion, hit the “Next” button. That’s it! Your first pixel will be up and running in no time!
Now that we have learned all about the Facebook Pixel and how to utilize it. Let’s move on to the Facebook Pixel Helper.
What is Facebook Pixel Helper?
The Facebook Pixel Helper is a Google Chrome plugin that ensures that the Facebook Pixel has apt placement on a website. It’s a pixel troubleshooting tool that checks whether it’s operating correctly and collects tracking data.
It displays the number of pixels put on the page, any problems, warnings, or difficulties encountered during the pixel installation process. You may modify the pixel after it displays the faults to ensure that it functions properly. You can monitor the pixel and create fantastic Facebook ad campaigns. By going via the advertising manager, you may find the Facebook pixel code.
You may use the Facebook Pixel Helper to ensure your Facebook ad tracking pixels are active and operating well. It also informs you about problems, allowing you to modify your pixel and check it. Anyone who uses the Facebook tracking pixel for their advertising campaign will find it an effective tool. The best part about using the Facebook Pixel is that it is free! And so is the Chrome extension for the helper!
- Open your Chrome Browser
- Locate the Facebook Pixel Helper extension
Click here to install the Facebook Pixel Helper extension.
- Installing the Facebook Pixel Helper
After locating the extension, click on Add to Chrome to embed the extension into your browser.
A pop-up will display; remember to click on the “Add extension” option to add the extension to your browser beside your website URL.
After its addition, you can find the extension on the right of your address bar. Clicking on it will provide you with an interface to turn it on or off.
After you enter the website, the icon becomes colored, and a small notification icon is visible at the bottom when the tool detects the pixels.
- Begin using Facebook pixel
Start utilizing the pixel now that you’ve finished using the pixel helper. You may pull down the drop-down menu after clicking on the Pixel tracker. The drop-down option will show information about it and any flaws present. You can look for your pixel in Facebook’s ad management.
Using the Facebook Pixel Helper is easy once you get the hang of it. But while using the extension, users face several common issues that we should address here in this article too! Let’s take a look at them!
Common Errors While Using Facebook Pixel Helper:
While setting it up is easy, users of Facebook Pixel Helper report some common issues frequently. These issues are easy to fix and take no more than 5 minutes! Let’s take a look at them.
- Pixel Not Available:
This is one of the most typical mistakes you’ll come across. If this message appears, Facebook Pixel Helper could not locate any code that seemed to be a Facebook pixel on the page. It’s also conceivable that the webpage pixel supplied didn’t match a known pixel.
It’s critical to correct the issue, and the first step is to examine your website’s coding. Verify that the code integration on the webpage was successful. If you’ve previously done so, check the Pixel ID in the Facebook advertising management settings to make sure it’s right.
- Failure to Set Standard Events:
When setting up a pixel, everyone selects a set of standard events to monitor. Such events may include watching a movie or simply clicking on a specific button on a webpage. You will almost certainly receive a non-standard events issue if you are occasionally more focused on conversion monitoring and setting up a standard event.
This mistake redirects you to the Facebook settings page rather than the Pixel. Examine the standard event in detail and note why an issue like this occurred in the first place. It may be necessary to make changes to your usual event settings to ensure that Facebook can monitor them.
- Failure to load Pixels:
This error means that your site’s Pixel Helper detected what seems to be Facebook pixel code, but the actual HTTP request never made it across. It is usually due to a coding error, but it can also happen if the pixel activates itself by a dynamic event such as a button click. In such a scenario, the mistake will vanish when you click the button.
These are some common errors users occasionally face when using the Facebook Pixel Helper. Some more errors appear on the Facebook Business FAQ page. Redirect yourself by clicking on the link and find the solution to everything related to the Facebook Pixel Helper!
Also Read:
Facebook Chatbot- Easy Way to Automated Conversations
Looking Deep Into The B2B Lead Generation: 08 Intriguing Benefits
How To Use Lead Generation Chatbot: Tips To Convert Leads
Put your information to better use with Socioleads!
The Facebook Pixel provides you with valuable information that marketers tend to value very highly out in the real world. Socioleads helps you harness the true potential of that information and use it to attract traction and maintain it by engaging with your followers. There’s so much more to Socioleads that will make you appreciate your occupation ten folds!
Socioleads assists you and your business by handling customer service for you, so you don’t have to. Consumer-brand conversations are primarily questions that need basic replies until the customer elaborates. Even if they are generic, they are still a difficult assignment for any human to complete.
Socioleads takes care of it for you, allowing you to contact customers only when necessary. Socioleads‘ consumer interaction techniques are failsafe, and they operate with a variety of social media platforms and instant messaging services throughout the internet.
Instant messaging is becoming a more popular way for customers to communicate with companies. If their questions receive an answer quickly, they are more likely to remain with the company and enjoy it, which is crucial in any social media campaign.
You can automate all of your answers using Socioleads, so you don’t have to spend money on a human moderator to sit and react to all of the “hellos” and “hi’s” from individuals texting your business. It saves the brand a significant amount of time and money to better use in other areas.
Socioleads can help you save all of the money you’d otherwise spend on customer service. The enormous quantity of messages coming in during a social media campaign on whatever platform they have on their screen makes human responses scratch their heads and bewilder them.
Keeping track of all these customers becomes difficult for a single individual or a team. However, because each of these clients can generate money, they must be regarded as an individual. Every letter, remark, or question that appears on our page should be answered. Socioleads will help you get started with customer interaction and guarantee that every consumer has a positive experience. Don’t forget to look into Socioleads!









Write a Comment